About Me

My photo
I am 27 years old, a wife, a mom, a sister, a newish home owner, a daughter, and a best friend. I am in the process of becoming a self proclaimed photographer, interior designer, and a chef. I want nothing more than to always remember the most positive and precious things in my life. I am very blessed to have such wonderful memories and my brain is to busy to remember them all. Blogging is my way to share and never forget.

Tuesday, January 8, 2013

Cauliflower Mash


CAULIFLOWER MASH

Ingredients:
1 head of cauliflower
garlic cloves
2 bay leafs
3 cups water
1 tbs butter
1tsp salt
milk if needed

Directions:
Put water, bay leafs, garlic cloves in crockpot
Cut up the heads of the cauliflower. {I cut them medium sized}
Place cauliflower in crockpot
Cook on high 2-3 hours, low 4-5 hours
Remove bay leafs and garlic cloves
Drain water

Mash cauliflower with potato masher (I did not have a masher so I used my blender.. this did not work easy but once I figured out to grate it and move it around, it came out perfect)
You want to mash until the texture is what you are looking for
Add milk if you need to but add it by the little. I did add milk to mine so it would blend better

Notes:
I loved this. At first the flavor and texture took some getting use to but after a few bites I really started to enjoy it. YUMMY. I will be making this again for sure! Guess I need to get a masher?! You could do so much with this. Add gravy (maybe? I don't eat gravy) add cheese and chives. The possibilities are endless. SO HEALTHY!


The pictures don't look that great and as you can see I tried to instagram them so you could see the results better but no such luck. My advice, make it yourself to see AND TASTE the results!


Back in the kitchen {again}

I am offically back in the kitchen! The holidays are over and the boring new year has begun. I love the boring new year. Time for things such as.. COOKING

For the month of January, I am going meatless {except for fish.. I don't think I could do it without fish.. not yet anyways} So the post this month will be meatless meals! Exciting right?


What's in store for this weeks menu?


Cauliflower Mash - somthing I have been wanting to make for a long while
Meatless burritos - to get me past the mexican cravings
Baked eggs with artichoke - if this jar of artichokes can last until Thursday
Mushroom lintel soup - I have never had lintels
Stuffed potatoes - I know, potatoes = carbs
a few different Salads
and some random things that I don't remember but are on my list just a few feet away. Yes, I am being lazy right now

Get ready because the first dish is in the pot right as we speak type!

Tuesday, August 14, 2012

Smoked Salmon Puff Bites


In Hawaii we had a personal chef come to cook us dinner. She made amazing tuna, shrimp, chicken, dessert, and pretty much anything else you can think of. This had me wanting to try and cook some foods I am not a fan of. Dun, dun. duuun.. SALMON

I try to like it. I really try to like it. I just can’t like it.. but once again, I tried


Smoked Salmon Puff Bites

  • 3/4 cup flour
  • 3 eggs
  • 1/2 cup milk
  • 1/2 cup water
  • 3/4 stick of butter
  • 1 tsp sugar
  • 1/2 tsp salt
  • cream cheese (desired amount)
  • smoked salmon (desired amount)
  • lettuce (2 leaves per puff)


  1. Preheat oven 350*
  2. pour water and milk in pot on medium heat
  3. add butter, sugar, and salt.. bring to a boil
  4. remove the pot from heat and add flour
  5. stir well, then place pot back on heat for 1 minute while stirring (ball of dough)
  6. remove dough and place in a bowl to cool for 10-15 mins
  7. add one egg at a time, stirring each egg in the dough mixture
  8. place dough in piping bag or zip lock bag with corner cut
  9. pipe the dough into small amounts on backing sheet and bake for 10 mins, it may take longer than 10 mins depending on oven. I cut one open after 12 mins and the inside was still “wet” so I cooked longer until inside was not “wet”
  10. cut salmon into strips
  11. cut open each puff, add cream cheese, salmon, and lettuce
  12. ENJOY

This were really good, the puffs were awesome, but I could not make myself like the Salmon. I am going to use the puffs for tilapia or chicken in the future. If you like smoked salmon, you will love these!


IMG_3106IMG_3108

IMG_3109IMG_3110

IMG_3111IMG_3113

IMG_3116

Upside-down Crockpot Chicken Pot-Pie


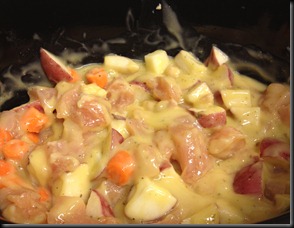
I have never been a fan of chicken pot pie. Maybe it was because I didn’t like/eat many veggies when I was younger or maybe because it just always looked like a bunch of mush. Whatever the reason, boy was I wrong! I probably have had maybe 10 chicken pot pies in my lifetime. Out of the ten, I actually cooked one myself. Oh My GOOOODNESS. and goodness is exactly what it was!


Upside-down Crockpot Chicken Pot–Pie


  • 2 Boneless chicken breast cut into chunks
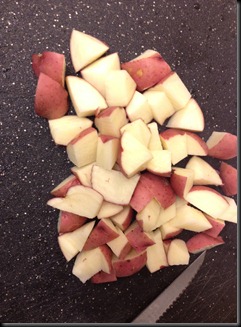
  • Red potatoes, as many as you want, cut into chunks (I think I used 4-6)
  • Baby carrots cut up (I am not a fan of cooked carrots so I didn’t use a lot
  • 2 cans (26 ounce) condensed cream of chicken soup (low sodium)
  • 3 cubes chicken bouillon
  • 2 tsp garlic powder
  • 1 tsp salt
  • parsley to taste
  • 1/2 tbls black pepper 
  • 1 (16 ounce) bag of frozen veggies of choice
  • choice of biscuits or cornbread (I used Grands biscuits)


  1. Put everything except frozen veggies in crockpot on high for 4 hours
  2. Add frozen veggies and cook on high for 1 hour or low for 2.5 hours
  3. Cook biscuits per directions
  4. Biscuit on plate/bowl and pour mixture on top


IMG_3075

IMG_3074

IMG_3076IMG_3077IMG_3100

Wednesday, June 6, 2012

The 1 Month Challenge


In exactly one month I will be on my way to a Hawaii. WOWZERS time has flown by! I remember saying in exactly 1 year, I will be on my way to Hawaii.. Next thing I know it will be exactly 1 week, then exactly 1 day. I am more than ready to be sitting in the sun with nothing to do but watch my chica boo swim in the private pool, eat fresh pineapple, and go zip lining in the rain forest!

So, that brings me to my 1 month challenge. LITTLE CARBS..

I can not promise myself that I will not have any carbs at all.. We have family functions coming up and the food is always soooo yummy! BUT, my challenge is to not cook with carbs. (or as little carbs as possible) Pretty much what I am saying is.. NO BREAD.. (ahhhhh) NO PASTA.. NO CEREAL.. and NO BEER.. NO BEER?! <------  that is going to be hard since I am in a faze where I crave blue moon with an orange. Actually any beer with an orange sounds amazing to me! Starting today.. RIGHT NOW.. carb cut back/cut out. I want to say I wont cook with carbs at all, but I think there may be carbs in some things I don’t realize has carbs.. Guess we will see. I have a meal plan for the next 2 weeks, my list is made, now I just have to go to Publix. Check back for recipes and updates!!


Wednesday, April 25, 2012

Almond Crusted Chicken Fingers


I love chicken fingers. Chicken fingers love my waist. This is the both of best worlds. Healthy and satisfying to cravings!


Almond Crusted Chicken Fingers

  • Boneless Chicken Strips (I say use organic chicken strips) as many as you want to cook, they heat up the next day great!
  • 1 Cup Almonds crushed. (I have used pre-crushed but I usually buy chopped almonds I have used whole almonds) and then I crush them in my blender)
  • Garlic powder
  • 1 tablespoon Dried Parsley
  • 1 /2 teaspoon Paprika
  • 2 teaspoons Dried Mustard
  • 1/2 teaspoon of Nutmeg
  • 1/2 Cup Wheat Germ. (I usually do not use wheat germ. I like it just with the almonds (plus it is healthier with just almonds) 
  • 2 egg whites, if you run out you can always add more egg whites, I just dislike wasting eggs
  • Cooking Spray


  1. Preheat oven 350*
  2. Cover pan with foil and spray with cooking spray
  3. In 1 bowl add all ingredients except egg and chicken
  4. In 2nd bowl, whisk egg whites.
  5. Dip the chicken in egg whites, let the excess drip off.
  6. Dip and cover the strips in the 1st bowl of mixture
  7. Bake for about 20-25 minutes, until cooked through. It will have a different look compared to fried chicken fingers so make sure not to over cook the chicken


Photo Apr 23, 5 09 04 PM
Pre chopped almonds

Photo Apr 23, 5 09 11 PMPhoto Apr 23, 5 14 01 PM
Blend the almonds to desired crushed-ness (I usually go ahead and crush all of them and store it in a mason jar in the pantry for easy access later in the week)

Photo Apr 23, 5 28 51 PM
Coat chicken and bake!


Photo Mar 29, 8 01 42 PMPhoto Mar 29, 8 02 01 PM
SOO YUMMY


Results:

I cook these at least 2 times a week. They are one of the easiest meals and I could do it with my eyes closed. I usually bake extra for lunch the next day!

Baked Veggies


Like I have said before, I am not a fan of cooked veggies. With this said, I may have just found a dish that changes my mind on that. I was so excited to eat this after I cooked it that I {once again} forgot the after picture.. but try it out anyways.. trust me.. YUMMY!


BAKED VEGGIES

Zucchini
Squash
Sweet Potato
Garlic powder
Minced Onion or chopped onion
EVOO
Cheese
*EXTRA TOUCH* I also added laughing cow wedge cheese because it is wonderful to cook with

  1. Preheat 350*
  2. Slice your veggies in thin slices {I also peeled my veggies because I enjoy using the peeler I have.. but it is not a must}
  3. Mix garlic, onion, and dab of EVOO in the bottom of your baking dish
  4. Place veggies in pan
  5. Add your laughing cow wedge cut in to chunks at this point if you are using the laughing cow cheese
  6. Sprinkle spices (I sprinkled garlic on top and mined onion, then added some parsley)
  7. Cover and bake for 15 mins
  8. Take out, add cheese and recover
  9. Let stand (while covered) so cheese melts
  10. Serve or Eat our of the pot if you cant wait.. like me

Photo Apr 23, 4 53 37 PMPhoto Apr 23, 5 01 19 PM

Results:

AMAZING. AMAZING AMAZING.. A.M.A.Z.I.N.G! I will be making this weekly, if not daily.. I ate it with my almond crusted chicken fingers.